Understanding Drip Campaigns:
Ever wished you could send a series of emails automatically, tailored to your audience’s journey? That’s the magic of Drip campaigns. They’re like a well-choreographed dance, delivering messages in a sequence based on user actions or predefined timelines. It’s not just about sending emails; it’s about creating a personalized and engaging experience for your audience.
Say someone signs up – bam, they get a welcome email, maybe with a discount to sweeten the deal. Then, a few days later, another email strolls in with more cool info about what you’ve got going on. It’s like a conversation that unfolds over time, not a one-shot deal.
And it’s not just for new pals; it works for reconnecting with the old gang too. If someone was checking out your goodies but didn’t hit that buy button, your email buddy sends a friendly reminder. Like, “Hey, you forgot this awesome thing in your cart!”
Imagine having this virtual helper keeping your audience engaged, informed, and excited about what you’re up to, all on autopilot. It’s your marketing magic wand, making sure your audience stays in the loop without you having to juggle a million things.
So, in a nutshell, the GetResponse Drip campaign is like having your own email wizard, telling your brand story, making connections, and keeping the buzz alive. Cool, right?
Why Drip Campaigns Matter
Imagine welcoming new subscribers, nurturing leads, or guiding customers through a purchase journey – all on autopilot. Drip campaigns make it happen, ensuring you stay top-of-mind with your audience without being intrusive. It’s about building relationships and boosting engagement, one step at a time.
Accessing GetResponse Drip Campaigns
- Login to GetResponse: Head to the GetResponse dashboard – your digital command center for all things email marketing. If you don’t have account yet, you may need to sign up for free in 3 minutes. No payment details required.
- Navigate to Automation:
- Select Workflow: A page will open with a blue button labeled “Workflow” ,
- Click on it to begin creating your workflow or drip campaign . It’s your gateway to setting up those automated, strategic email sequences.
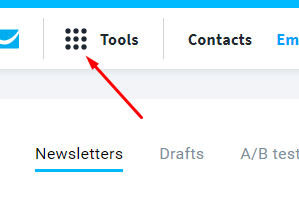
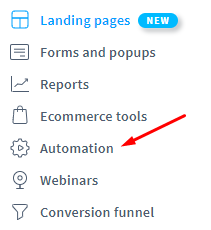
- At the top left corner click on “Tools”,
- A dropdown menu will open with all the available tools usually prominently placed. Click on “Automation”; this is where the Drip magic begins.
Crafting Your Drip Campaign
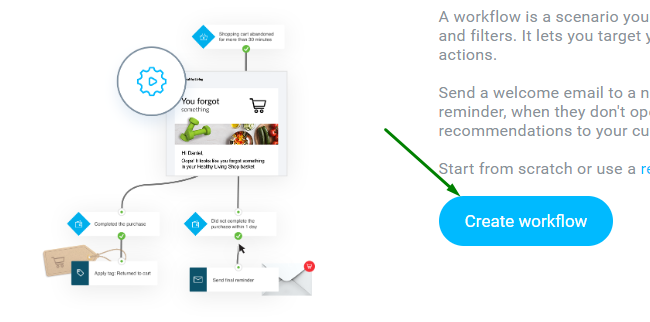
- Create a New Workflow: Hit the “Create Workflow” button – your canvas for orchestrating the perfect email sequence.
- Name Your Workflow: Give it a catchy name. Something that screams “engagement powerhouse” or maybe something simpler, but memorable.
- Add Your First Step: This could be a welcome email, a thank-you note, or whatever suits your campaign’s initiation. Click “Add Element” and choose the type of email you want to send.
- Define Triggers: Set the rules for when each email should be sent. Is it after a subscriber signs up? After they click a specific link? Define these triggers to keep things dynamic.
- Craft Compelling Emails: Each email is a scene in your campaign story. Use GetResponse’s intuitive editor to craft visually appealing and persuasive content.
- Preview and Test: Before you hit the launch button, always preview and test your emails. Ensure they look amazing on different devices and that the links work seamlessly.
- Activate Your Drip Campaign: Once you’re satisfied, hit the activate button. Watch as your campaign unfolds, delivering value to your audience automatically.
Monitor and Optimize
Keep an eye on your campaign’s performance. GetResponse provides insightful analytics, showing you open rates, click-through rates, and more. Use these insights to tweak and optimize your Drip campaign for even better results.
And there you have it – a crash course in leveraging GetResponse’s Drip campaigns. Now, go ahead, experiment, and let the power of automated, targeted communication elevate your marketing game!
Practical Use Case 1: Boosting Product Sales Through Affiliate Drip Campaigns
Imagine you’re diving into affiliate marketing, promoting a range of awesome products. Here’s how a Drip campaign could work wonders in this scenario:
Objective: Increase affiliate product sales by nurturing leads and guiding them through a well-crafted email sequence.
1. Welcoming New Subscribers
- When someone subscribes to your affiliate newsletter GetResponse will trigger an email content to send a warm welcome email introducing yourself, emphasizing the value of your affiliate recommendations.
2. Educating Subscribers:
- 2 days after the welcome email is sent, GetResponse triggers a second email content to share informative content related to the affiliate products, highlighting their benefits and solving common problems your audience might face.
3. Showcasing Product Features:
- 5 days after the second email, a 3rd email content will be automatically sent to dive deeper into one of the affiliate products. Highlight specific features, share success stories, or provide a limited-time discount to create a sense of urgency.
4. Addressing Objections:
- 3 days after the third email, GetResponse automatically send the 4th email content to anticipate and address common objections or concerns potential customers might have. Provide additional testimonials, FAQs, or a comparison with competitors.
5. Limited-Time Offer:
- 4 days after the fourth email, a 5th email content will be sent on autopilot to introduce a limited-time offer or exclusive discount for subscribers, creating a sense of urgency to make a purchase.
6. Follow-Up and Feedback:
- 7 days after the fifth email, another triggers sends an email content to follow up with subscribers who haven’t made a purchase. Ask for feedback, offer additional support, or provide an extra incentive to encourage conversion.
7. Post-Purchase Engagement:
- After a purchase is made, GetResponse triggers the 7th email content to express gratitude, provide additional resources or tips related to the purchased product, and encourage customers to join a community or follow on social media for ongoing engagement.
8. Upsell Opportunities:
- 10 days after the post-purchase email, an 8th email content introduces related affiliate products or upsell opportunities based on the customer’s previous purchase, offering a personalized shopping experience.
9. Re-engagement for Inactive Subscribers:
- 14 days after the last interaction, GetResponse triggers the last email content to send a re-engagement email to inactive subscribers, perhaps with a special offer or new product recommendation to reignite their interest.
By strategically designing this Drip campaign, you’re not just promoting products but building a relationship with your audience, addressing their needs at each stage of the journey, and maximizing your affiliate marketing potential.
Practical Example Use Case 2: Campaign in Delivering Course Materials.
Let’s explore another practical example of using a Drip campaign to deliver course materials and enhance the learning experience:
Use Case: Drip Campaign for Course Material Delivery
Objective: Facilitate a seamless and engaging learning experience by delivering course materials progressively to students.
1. Welcome and Introduction:
- Trigger: Upon student enrollment in the course.
- Email Content: Send a welcome email introducing the course, the instructor, and providing initial guidance. Include a link to the course platform or materials.
2. Module 1 Kickoff:
- Trigger: 2 days after the welcome email.
- Email Content: Release the first module’s materials – lectures, readings, or assignments. Provide a brief overview of what students can expect to learn in this module.
3. Checkpoint and Clarifications:
- Trigger: 3 days after Module 1.
- Email Content: Check in with students, addressing common questions or concerns related to Module 1. Encourage participation in discussion forums or live Q&A sessions.
4. Assessments and Feedback:
- Trigger: 7 days after Module 1.
- Email Content: Share assessment materials, quizzes, or assignments related to Module 1. Provide guidelines for submission and offer constructive feedback on the importance of assessments in the learning journey.
5. Module 2 Launch:
- Trigger: 2 days after Module 1 feedback email.
- Email Content: Introduce Module 2 with enthusiasm. Highlight the connections between Module 1 and Module 2 to emphasize the course’s continuity.
6. Deep Dive and Additional Resources:
- Trigger: 5 days after Module 2.
- Email Content: Dive deeper into specific topics covered in Module 2. Provide supplementary materials, recommended readings, or links to relevant external resources for a comprehensive understanding.
7. Peer Interaction Focus:
- Trigger: 7 days after Module 2.
- Email Content: Encourage peer interaction and collaboration. Share discussion prompts, group project details, or initiate a virtual meetup for students to connect.
8. Mid-Course Reflection:
- Trigger: 10 days after Module 2.
- Email Content: Facilitate a mid-course reflection. Ask students to share their insights, challenges, and what they’ve gained so far. Use this feedback to tailor future content.
9. Final Module and Recap:
- Trigger: 5 days after mid-course reflection.
- Email Content: Launch the final module, summarizing key concepts from previous modules. Provide study guides, review sessions, and any additional materials to prepare for the course conclusion.
10. Course Completion and Next Steps:
- Trigger: After the final module.
- Email Content: Congratulate students on completing the course. Provide information on obtaining certificates, accessing post-course resources, and encourage them to leave feedback or join alumni communities.
By implementing this Drip campaign strategy, you’re not overwhelming students with information, but rather guiding them through a structured and engaging learning journey, fostering interaction, and ensuring a positive overall educational experience.
Recommended Posts!
- Tutorial: Get Started with GetResponse – A Step-by-Step Guide for Beginners.
- How to Integrate GetResponse with WordPress: Automate Revenue.
- Integrating GetResponse with WooCommerce.
- GetResponse: Accelerate affiliate Marketing in your WordPress website.
- Getting Started: Beginner’s Guide to Creating a Webinar.