- Introduction to WordPress
- 1.1 Overview
- 1.2 Key Features
- Setting Up Your WordPress Website
- 2.1 Choosing a Domain Name
- 2.2 Selecting a Hosting Provider
- 2.3 Installing WordPress
- 2.4 Configuring Basic Settings
- Themes and Customization
- 3.1 Choosing a Theme
- 3.2 Customizing Your Theme
- 3.3 Using Child Themes
- 3.4 Adding and Managing Widgets
- Plugins and Functionality
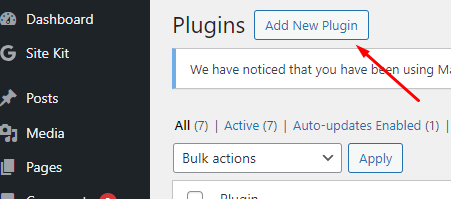
- 4.1 Installing Plugins
- 4.2 Essential Plugins for Every Website
- 4.3 Configuring Plugin Settings
- 4.4 Troubleshooting Common Plugin Issues
- Creating and Managing Content
- 5.1 Writing and Editing Posts
- 5.2 Creating Pages
- 5.3 Organizing Content with Categories and Tags
- 5.4 Managing Media (Images, Videos)
1. Introduction to WordPress
1.1 Overview and Background
WordPress is a free and open-source content management system (CMS) that allows users to create and manage websites easily. It is one of the most popular CMS platforms globally and is widely used for various types of websites, including blogs, business websites, e-commerce sites, and more. At its core, WordPress is a user-friendly content management system that empowers individuals and businesses to build and manage their online presence without the need for extensive coding knowledge. Launched in 2003, it has since evolved into the most widely used platform, powering over 40% of all websites on the internet. Its success lies in its open-source nature, allowing a global community of developers to contribute to its growth and enhancement.
WordPress offers a straightforward approach to website development, making it accessible to beginners while providing advanced customization options for seasoned users. With its intuitive interface, users can easily create and publish content, organize it with categories and tags, and modify the website’s appearance using themes. Its plugin architecture enables the integration of additional features effortlessly, turning a basic website into a powerful, tailored platform. Whether you’re a blogger, small business owner, or a large enterprise, WordPress provides a scalable solution that adapts to various needs and requirements.
In essence, WordPress has democratized the online landscape, allowing anyone with an internet connection to share their ideas, products, or services with the world. Its community-driven ethos fosters continuous improvement, ensuring that users benefit from the latest advancements in web technology. As we delve into the intricacies of WordPress, we’ll uncover the steps to harness its potential, from the initial setup to advanced customization, making the journey of website creation an exciting and accessible adventure for everyone.
1.2 Key features of WordPress
- User-Friendly Interface: WordPress provides an intuitive and easy-to-use interface, making it accessible to users with varying levels of technical expertise.
- Themes: Users can choose from a vast array of themes to change the look and feel of their websites. Themes allow users to customize the design and layout without requiring advanced coding skills.
- Plugins: WordPress has a robust plugin architecture that allows users to extend the functionality of their websites. There are thousands of plugins available for various purposes, including SEO optimization, e-commerce, security, and more.
- Content Management: WordPress excels as a content management system, making it easy to create, edit, and organize content. It supports various content types, including blog posts, pages, and custom post types.
- Community Support: WordPress has a large and active community of users and developers. This community contributes to the software’s development, creates themes and plugins, and provides support through forums and online resources.
- Search Engine Friendly: WordPress is designed with search engine optimization (SEO) in mind, making it easier for websites built on the platform to rank well in search engine results.
- Customization: Developers can create custom themes and plugins to tailor WordPress to specific needs. This level of customization makes it suitable for a wide range of websites, from simple blogs to complex e-commerce platforms.
- Open Source: WordPress is released under the GNU General Public License (GPL), which means it is free to use, modify, and distribute.
2. Setting Up Your WordPress Website
2.1 Choosing a Domain Name
Before diving into the world of website creation, let’s talk about the first step: choosing a domain name. A domain name is essentially the unique address of your website on the internet. It’s what people type into their browsers to find and visit your site. Think of it as your online identity – it’s how visitors will recognize and remember you in the vast digital landscape.
Now, selecting the right domain name is crucial. It’s not just an address; it’s a representation of your brand or the content you want to share. Ideally, it should be something easy to remember, relevant to your website’s purpose, and reflective of your identity. Imagine it as the front door of your virtual space – you want it to be inviting, easy to find, and leaving a positive impression. So, let’s explore the art of choosing a domain name that not only directs people to your site but also leaves a lasting and positive impression.
When choosing a domain name, simplicity is your best friend. Aim for a name that is easy to spell, pronounce, and remember. Avoid complicated words or spellings that might confuse your visitors. Keep it concise and to the point. Shorter domain names are not only easier to remember but also less prone to typos.
Consider incorporating keywords related to your website’s content or purpose. This can help with search engine optimization (SEO) and make it clear to visitors what your site is about. For example, if you’re creating a blog about travel, including words like “wander,” “explore,” or “journey” in your domain could convey the theme effectively.
Another important factor is choosing the right domain extension, like .com, .net, or .org. While there are various extensions available, .com is often the most widely recognized and trusted. It’s a safe choice if it’s available for your preferred domain name. However, depending on the nature of your website, other extensions may be more suitable.
Lastly, check the availability of your chosen domain name. There are many websites where you can do this, and it’s a crucial step before settling on a name. If your first choice is taken, be creative with variations or consider using a different extension.
In essence, your domain name is the gateway to your online presence. Take the time to choose wisely, keeping it simple, relevant, and aligned with the message or brand you want to convey. It’s your virtual address, so make it welcoming and memorable for all those who seek to explore what your website has to offer.
2.2 Selecting a Hosting Provider
Let’s demystify the world of web hosting. Imagine your website as a house, and web hosting as the land on which your house stands. Web hosting is essentially a service that provides the space, or server, where all the files, images, and content of your website reside. It’s like renting a plot of land to build your online home.
Now, choosing the right hosting provider is crucial. It’s akin to picking a trustworthy landlord who ensures your house stays secure, accessible, and in good condition. A reliable hosting provider ensures that your website is available to visitors around the clock, and it plays a significant role in the speed and performance of your site.
So, let’s explore the key factors to consider when selecting a hosting provider, ensuring that your online house has a sturdy foundation and runs smoothly for all your visitors.
Understanding Your Hosting Needs: Before you choose a hosting provider, it’s important to understand your website’s needs. Consider factors like the type of website you’re building, the amount of traffic you expect, and any specific features or technologies your site may require. This knowledge will help you select a hosting plan that aligns with your website’s requirements.
Contact us if your are not sure about your website requirements. We offer free Consultation at Webstar SEO.
Reliability and Uptime: Reliability is like having a dependable landlord who ensures your house is always open for visitors. Check the hosting provider’s uptime guarantees – you want your website to be accessible to visitors consistently. Look for providers with a reputation for minimal downtime and quick issue resolution.
Speed and Performance: Imagine your website’s speed as the efficiency of your house. Faster websites provide a better user experience. Choose a hosting provider with servers that are optimized for speed. Some providers offer content delivery networks (CDNs) to further enhance loading times, especially for visitors from different parts of the world.
Support and Customer Service: Good support is like having a reliable maintenance team for your online house. Check for a hosting provider that offers responsive customer support. This is crucial if you encounter any issues or have questions about managing your hosting account. Look for providers with 24/7 support through various channels like live chat, email, or phone.
Scalability and Flexibility: Consider the future growth of your website – you want a hosting provider that can grow with you. Check if the provider offers scalable hosting plans, allowing you to easily upgrade as your website expands. This flexibility ensures that your hosting solution remains suitable as your online presence evolves.
Cost and Value: Budget is an important consideration, but it’s not just about finding the cheapest option. Consider the overall value offered by the hosting provider. Look for a balance between cost, features, and the level of service provided. Some providers offer introductory discounts, so be sure to understand the long-term pricing as well.
By considering these factors, you’ll be equipped to choose a hosting provider that best suits your website’s needs. It’s like finding the perfect piece of land for your online house – secure, reliable, and ready to accommodate your digital dreams.
2.3 Installing WordPress
Now that you’ve secured your virtual land and chosen a trustworthy hosting provider, it’s time to set up your online home by installing WordPress. Don’t worry; it’s like putting the final pieces together to make your website come to life.
Access Your Hosting Control Panel:
- Begin by logging into your hosting account. Once logged in, navigate to the hosting control panel. This is your central hub for managing various aspects of your hosting services. The control panel is where you’ll find tools and utilities to set up and configure your website. Look for an option such as “WordPress Installer” or “Softaculous.” These tools simplify the installation process, making it accessible even for those without technical expertise.
Select WordPress and Choose a Domain:
- Within the installer tool, you’ll typically find a list of available applications. Locate and select WordPress from this list. Next, choose the domain where you want to install WordPress. This is akin to selecting the specific piece of land on which your online home – your website – will be built. Confirm your selection, and you’re ready to move to the next step.
Configure Your Settings:
- Now comes the fun part – customizing your website. You’ll be prompted to choose a username and a strong password. Think of this as securing the key to your online house. Additionally, fill in your website’s name and description. This is like putting up a sign to let visitors know what your website is all about. These settings define the initial look and feel of your site, and you can always adjust them later.
Click ‘Install’:
- With your settings in place, it’s time to initiate the installation process. Simply click the ‘Install’ button. This action signals the installer to start creating the necessary files and configurations for your WordPress site. It’s akin to the construction crew getting to work, setting up the framework for your online home. The installation process typically takes just a few moments.
Celebrate – You’re Live!:
- Congratulations! Your WordPress installation is complete. You can now celebrate because your website is officially live on the internet. To view your website, type your domain into the browser. It’s like stepping into your brand-new house for the first time. This moment marks the beginning of your online journey, and from here, you have the canvas to craft and shape your website according to your vision.
Installing WordPress is a pivotal step – it’s the moment when your online presence transforms from an idea to a tangible reality. With the foundation laid, you’re now ready to explore the myriad possibilities that WordPress offers to create and share your content with the world. Enjoy the exciting journey ahead!
2.4 Configuring Basic Settings
Now that your WordPress website is up and running, it’s time to fine-tune the details and make it truly yours. Configuring basic settings is like arranging the furniture and choosing the color scheme for your new online home – it sets the tone for the overall experience. Let’s walk through the essential steps in the simplest language.
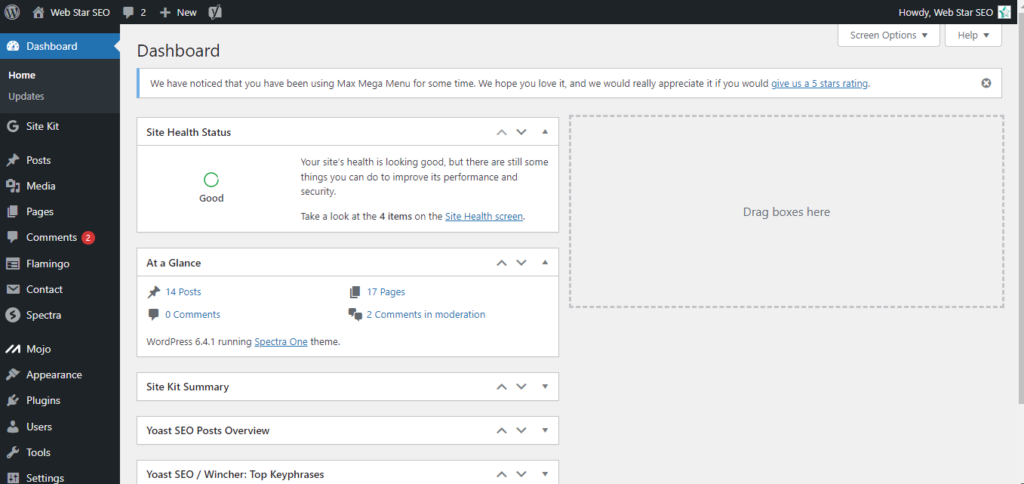
Access Your WordPress Dashboard:
- Begin by logging into your WordPress dashboard, which is the central control center for your website. To access it, simply add “/wp-admin” to your domain name in the browser (e.g., www.yourwebsite.com/wp-admin). Log in using the credentials you established during the WordPress installation. This dashboard is your online command center, where you’ll manage everything from content creation to site customization.
Navigate to ‘Settings’:
- On the left side of your dashboard, you’ll find a menu. Locate and click on the ‘Settings’ option. Think of this as entering a room where you can adjust and fine-tune various aspects of your website to align with your preferences and goals.
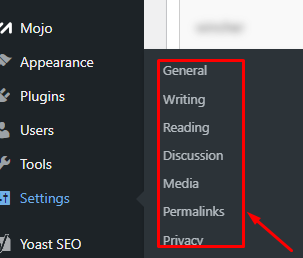
General Settings:
- In the ‘General’ settings section, you can set your site’s title and tagline. Imagine this as putting a nameplate on your house. This is the first thing visitors will see, so make it reflective of your website’s purpose. You can also adjust the URL structure here, deciding how your website’s address will appear.
Permalinks:
- The ‘Permalinks’ section allows you to configure how your website’s URLs look. Choose a structure that suits your content organization. This is like deciding on the layout of the rooms in your house. Common options include using post names or category names in the URLs.
Reading Settings:
- Decide whether you want your homepage to display your latest posts or a static page. Think of this as choosing what visitors see when they first step into your house. It could be the dynamic updates on your latest content or a carefully curated introduction to your site.
Discussion Settings:
- Manage how comments work on your site in the ‘Discussion’ settings. It’s like deciding whether guests can leave notes in your guestbook. Configure settings for comment approval, notifications, and other interaction aspects, creating a welcoming space for engagement.
Media Settings:
- In the ‘Media’ settings, you can determine the size and organization of your media files, such as images. Think of this as organizing your photo albums – ensuring everything looks just right and is easily accessible.
Save Changes:
- Once you’ve made your desired adjustments in each settings section, don’t forget to save your changes. This is akin to finalizing the setup of your living space. Scroll to the bottom of each settings page and click the ‘Save Changes’ button to ensure that your preferences are applied and your digital space reflects your style.
Configuring these basic settings is not just a technical task; it’s a creative process that allows you to personalize and shape your WordPress website. Your online home should feel comfortable, inviting, and uniquely yours. Enjoy the journey of making it a true reflection of your identity and vision!
3. Themes and Customization
3.1 Choosing a Theme
Now that your WordPress home is set up, it’s time to decorate it with a theme. Think of a theme as the interior design of your online space – it determines how your website looks and feels. Choosing the right theme is like selecting the color palette, furniture, and decor for your rooms. Let’s keep it simple:
- Access Your WordPress Dashboard:
- Log in to your WordPress dashboard. It’s like entering your cozy home, and from here, you can make it uniquely yours. Navigate to the ‘Appearance’ section on the left sidebar – think of it as your design studio.
- Click on ‘Themes’:
- In the ‘Appearance’ section, click on ‘Themes.’ This is where the magic happens. It’s like opening the catalog of design options for your online home.
- Explore Available Themes:
- Browse through the available themes. These are like different styles of furniture or decor. You can preview how each theme will look on your site before making a decision.
- Consider Your Content:
- Think about the type of content you’ll be sharing. If you’re a blogger, a theme that highlights your articles might be ideal. For a portfolio, you’d want a theme showcasing your work. It’s like choosing furniture that complements the purpose of each room.
- Look for Simplicity and Responsiveness:
- Simple themes are often the most versatile. Consider how the theme adapts to different screen sizes (responsiveness). This ensures your website looks good whether visitors are using a computer, tablet, or phone – like furniture that fits well in any room.
- Check Reviews and Ratings:
- Just like checking reviews before buying furniture, explore reviews and ratings for themes. This helps ensure you’re selecting a theme that’s reliable and liked by others.
- Install and Activate:
- Once you find the perfect theme, click ‘Install’ and then ‘Activate.’ It’s like arranging your furniture exactly the way you want it. Activating the theme brings your chosen design to life on your website.
- Customize Your Theme:
- Head to the ‘Customize’ option under ‘Appearance.’ This is your design studio, allowing you to tweak colors, fonts, and other elements. It’s like adding personal touches to each room in your house.
- Preview and Publish:
- Preview your changes and, when you’re happy, hit ‘Publish.’ It’s like stepping back and admiring your decorated home before inviting guests over.
Choosing a theme is a delightful part of creating your online space. It’s about finding a design that resonates with you and enhances the overall experience for your visitors. Enjoy the process of making your website visually appealing and uniquely yours!
3.2 Customizing Your Theme
Now that your theme is like the perfect outfit for your online home, let’s talk about customizing it to make it uniquely yours. Think of customization as adding your personal touch to each room – arranging furniture, picking colors, and making everything feel just right.
- Access Your WordPress Dashboard:
- Start by logging into your WordPress dashboard. It’s like opening the door to your online home, where you have control over how everything looks. Find the ‘Appearance’ tab on the left – think of it as your design studio.
- Click on ‘Customize’:
- In your design studio, click on ‘Customize.’ It’s like entering the room where you can change the wallpaper, rearrange furniture, and make your online space feel uniquely yours.
- Explore ‘Site Identity’:
- Look for ‘Site Identity.’ This is where you can add a site title and tagline – it’s like putting a nameplate on your house. Make it catchy or meaningful, something that represents your online identity.
- Adjust Colors and Fonts:
- Imagine your theme as a canvas. In the ‘Colors’ and ‘Fonts’ sections, you can change the color scheme and text styles. It’s like choosing the paint for your walls and deciding the font of your favorite book.
- Header and Footer Settings:
- The header is like the entrance to your home, and the footer is like the goodbye. Customize them to your liking. Add a logo, adjust the menu – make it welcoming. It’s like decorating your front door and porch.
- Background Image:
- If you want to add a personal touch to your site’s background, upload an image in the ‘Background Image’ section. It’s like hanging a favorite painting on the wall of your online living room.
- Widgets – Your Digital Decorations:
- Widgets are like digital decorations for your website. In the ‘Widgets’ section, you can add things like a search bar, recent posts, or social media links. It’s like placing decorations on shelves around your digital rooms.
- Preview Your Changes:
- Don’t forget to click ‘Preview’ after making changes. It’s like taking a sneak peek to see how your adjustments look before showing them to your visitors.
- Save and Publish:
- When you’re happy with how everything looks, hit ‘Save & Publish.’ It’s like finalizing your room designs. Your visitors will now see the personalized, uniquely you version of your online space.
Customizing your theme is like turning a house into a home. Enjoy the process of making your online space comfortable, welcoming, and truly reflective of your style. It’s your digital canvas – have fun creating!
3.3 Using Child Themes
Alright, let’s delve deeper into the concept of a child theme – think of it as a creative playground for your website, allowing you to experiment and customize without risking the integrity of your main design.
What’s a Child Theme:
- A child theme is like a mini-wardrobe for your website. Imagine your main theme as your favorite outfit – stylish and well-put-together. Now, the child theme is like having a smaller set of clothes that you can play around with, adding accessories or changing details without altering the entire ensemble.
Why It’s Important:
- Consider having a favorite outfit that you occasionally want to tweak – maybe add a cool accessory or try a different hairstyle. A child theme functions similarly for your website. It enables you to make modifications, introduce new features, or adjust styles without jeopardizing the core design of your main theme.
Benefits of Using a Child Theme:
- Play Safe:
- It’s like testing a new hairstyle without committing to a drastic change. A child theme allows you to experiment, and if something goes awry, your main theme (your original outfit) remains intact.
- Updates Won’t Undo Your Style:
- Picture getting a haircut and deciding to change your hair color later. A child theme ensures that when the main theme undergoes updates, your additional tweaks and styles stay preserved, untouched by the makeover.
- Easy to Fix Mistakes:
- Consider putting on mismatched shoes by accident. Mistakes happen. A child theme provides you with the flexibility to rectify errors without the need to redo your entire outfit. It’s like changing one accessory without starting your whole wardrobe from scratch.
How to Set Up a Child Theme:
- Creating a child theme is akin to establishing an extension to your wardrobe – a designated space for experimentation and customization.
- To set up a child theme, envision copying your main outfit but in a smaller size. It maintains the essence of the original but allows you to add new accessories or alter small details without touching the primary design.
- In practical terms, it’s like having a backup outfit ready. If you accidentally spill coffee on your main outfit (something goes wrong), your child theme (backup outfit) can seamlessly take its place without any disruptions.
Additional Insights:
- Think of the child theme as your website’s backstage area. It’s where you prepare for the show, test different looks, and refine your appearance before revealing it to the audience (your visitors).
- Like having a sketchbook for your artistic ideas, a child theme serves as a canvas for your creative web design endeavors. It’s the space where you bring unique concepts to life before integrating them into your main theme.
- Remember, a child theme is not just about experimenting; it’s about ensuring stability. It safeguards your website’s core design while giving you the freedom to explore and enhance its visual appeal and functionality.
In Simple Terms:
- A child theme is your website’s creative hub. It provides a secure environment for trying out new designs, features, and styles without jeopardizing the established charm of your main theme. It’s like saying, “Let’s have some design fun without losing what we already love!” So, go ahead, create a child theme, and let the web-fashion adventures unfold!
3.4 Adding and Managing Widgets
Alright, let’s talk about adding and managing widgets on your website. Widgets are like the decorations and useful tools that make your online space more lively and functional. It’s as simple as arranging your favorite items on a shelf.
Access Your WordPress Dashboard:
- Begin by logging into your WordPress dashboard. It’s like opening the door to your online home, where you can make your space more interesting and useful.
Find the ‘Widgets’ Section:
- In the dashboard, look for the ‘Widgets’ section. Think of this as your digital shelf where you can place various items to enhance your website’s look and functionality.
Explore Available Widgets:
- Widgets are like digital ornaments for your website. Explore the available ones – they range from showing recent posts to adding a search bar or social media links. It’s like choosing the decorations you want on your digital shelf.
Drag and Drop:
- Adding widgets is as easy as placing items on a shelf. Simply drag the widget you want from the available ones and drop it into the widget area where you’d like it to appear on your site.
Configure Widget Settings:
- Just like arranging items neatly on your shelf, some widgets allow you to configure settings. Click on a widget to open its options – adjust the title, choose what it displays, or customize its appearance. It’s like making sure each item on your shelf looks just the way you want.
Preview Your Changes:
- Don’t forget to preview your changes before showing them to your visitors. It’s like taking a step back and admiring your newly decorated shelf before inviting friends over.
Organize Widget Areas:
- Think of widget areas as different sections on your shelf. You can place widgets in different areas like the sidebar, footer, or even within specific pages. It’s like organizing your shelf by grouping similar items together.
Remove Unwanted Widgets:
- If you decide you don’t want a particular widget anymore, removing it is simple. Just like decluttering your shelf, drag the widget out of its area, and it’s gone.
Save Your Changes:
- Once you’re satisfied with your widget arrangement, don’t forget to save your changes. It’s like finalizing the layout of your digital shelf – ensuring that it looks just the way you want it.
Adding and managing widgets is a fun way to personalize your website. It’s like decorating your online home with items that not only look good but also serve a purpose. So, go ahead, explore the world of widgets, and make your digital space uniquely yours!
4. Plugins and Functionality
A WordPress plugin is a piece of software that you can “plug into” your WordPress website to add new features or improve existing ones. These features could be anything from a contact form, a photo gallery, a social media sharing button, or even tools to improve your website’s security.
So, in simple terms, a WordPress plugin is like an extension or accessory that you can attach to your website to make it do more things and work better for you.
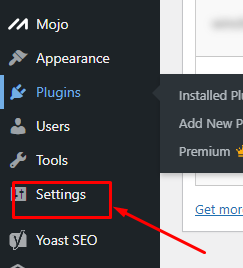
4.1 Installing Plugins
Option 1: Installing a Plugin from the WordPress Plugin Repository
- Login to Your WordPress Dashboard:
- Open your web browser and navigate to the admin area of your WordPress site by adding “/wp-admin” to the end of your domain (e.g., yourdomain.com/wp-admin).
- Log in using your WordPress username and password.
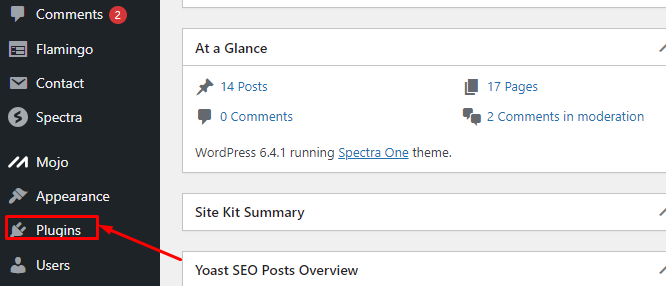
- Navigate to the Plugins Page:
- Once logged in, you’ll be in the WordPress dashboard. Look for “Plugins” in the left sidebar and click on it.
- Click on “Add New”:
- On the Plugins page, you’ll see an “Add New” button at the top. Click on it to proceed to the plugin installation screen.
- Search for the Plugin:
- In the search bar on the top right, type the name or functionality of the plugin you’re looking for.
- Browse the search results, and when you find the desired plugin, click “Install Now” next to it.
- Activate the Plugin:
- After the installation is complete, a button labeled “Activate” will appear. Click on it to activate the plugin.
Option 2: Installing a Plugin Manually
- Download the Plugin:
- Visit the official WordPress Plugin Repository or a trusted source and download the plugin ZIP file to your computer.
- Upload the Plugin:
- In your WordPress dashboard, go to “Plugins” and click on “Add New.”
- Choose the “Upload Plugin” option.
- Click the “Choose File” button, select the ZIP file you downloaded, and click “Install Now.”
- Activate the Plugin:
- After the installation is complete, click the “Activate” button to activate the plugin.
Option 3: Installing a Premium Plugin
- Download the Plugin ZIP File:
- After purchasing a premium plugin, download the ZIP file from the vendor’s website to your computer.
- Upload the Plugin:
- In your WordPress dashboard, go to “Plugins” and click on “Add New.”
- Choose the “Upload Plugin” option.
- Click the “Choose File” button, select the premium plugin ZIP file, and click “Install Now.”
- Activate and Configure:
- Once the installation is complete, click the “Activate” button.
- Follow any additional setup or configuration steps provided by the premium plugin to ensure proper functionality.
4.2 Essential Plugins for Every Website
Creating a powerful and functional website is like building a well-equipped home. Let’s explore essential plugins – the tools that will add valuable features and make your website even more awesome, without needing a tech degree.
- Yoast SEO – Your Website’s Tour Guide:
- Think of Yoast SEO as your website’s tour guide. It helps your site get noticed by search engines, guiding you on how to optimize content for better visibility. It’s like having a friendly assistant ensuring your site is easy to find in the vast online landscape.
- W3 Total Cache – The Speed Booster:
- W3 Total Cache is like the turbo boost for your website. It speeds up loading times, ensuring your visitors don’t have to wait. Imagine it as upgrading your internet speed for a smoother and faster browsing experience.
- Akismet – The Spam Shield:
- Akismet is your website’s spam shield. It’s like having a security guard that filters out unwanted comments and keeps your site clean from spam. This way, you can focus on genuine interactions without the clutter.
- UpdraftPlus – The Backup Buddy:
- Consider UpdraftPlus as your backup buddy. It’s like having a safety net for your website. It regularly saves copies of your site, so if anything goes wrong, you can restore it to a previous, healthy version.
- Elementor – The Design Maestro:
- Elementor is like the interior designer for your website. It lets you create stunning pages without touching any code. It’s as simple as dragging and dropping elements to design your online space exactly how you want it.
- Wordfence Security – The Guardian:
- Wordfence Security acts as the guardian of your website. It’s like having a security system that protects against threats and monitors your site for any suspicious activities. Your website stays safe and secure.
- WooCommerce – The Shopkeeper:
- If your website is a shop, WooCommerce is the shopkeeper. It’s like opening a digital store, allowing you to sell products effortlessly. From managing inventory to processing payments, it’s your all-in-one store solution.
- Smush – The Image Optimizer:
- Smush is like the personal trainer for your website’s images. It optimizes and compresses images, ensuring your site stays fit and loads quickly. It’s like having images that look great without slowing down your website.
- Contact Form 7 – The Communication Hub:
- Contact Form 7 is like the communication hub of your website. It lets you create simple, effective contact forms. It’s as easy as setting up a mailbox – your visitors can reach out to you without any fuss.
- MonsterInsights – The Analytics Guru:
- MonsterInsights is your website’s analytics guru. It’s like having a personal data analyst that provides insights into your site’s performance. Understand your audience and tailor your content for maximum impact.
Adding these essential plugins to your website is like furnishing each room with must-have items. They enhance your site’s functionality, security, and user experience, making it a welcoming and efficient online space. So, go ahead, explore these plugins, and watch your website transform into a powerful and user-friendly platform!
5. Creating and Managing Content
5.1 Writing and Editing Posts
Creating and refining posts for your website is like telling a captivating story. Let’s navigate the process of writing and editing posts in a way that’s as engaging as polishing your favorite piece of writing.
1. Access Your WordPress Dashboard:
- To embark on your writing journey, log into your WordPress dashboard. It’s like opening the door to your creative space, where you shape the narrative of your website.
2. Navigate to ‘Posts’:
- In the dashboard, locate the ‘Posts’ section. Think of this as your canvas – the place where you’ll paint the narrative of your website with words, images, and ideas.
3. Click on ‘Add New’:
- Once in the ‘Posts’ section, click on ‘Add New.’ This is like opening a fresh page in your notebook, ready for your ideas to come to life.
4. Craft Your Content:
- Begin writing your post. Imagine this as crafting the opening lines of a story – it could be an article, a personal reflection, or anything you want to share. Let your creativity flow as you bring your thoughts to the digital page.
5. Use the Block Editor:
- WordPress employs a Block Editor, making it as intuitive as arranging building blocks. Each block can be a paragraph, an image, a heading – it’s like assembling the elements of your story visually.
6. Add Headings and Subheadings:
- Headings and subheadings are like chapters and sections in a book. Use them to organize your content, making it easy for readers to follow along.
7. Insert Media:
- Enhance your narrative by inserting media – images, videos, or audio. It’s like illustrating your story with visuals to engage and captivate your audience.
8. Format Text:
- Text formatting is your stylistic touch. Bold important points, italicize for emphasis, and create lists to break down information. It’s like using punctuation and font styles to give your writing a unique voice.
9. Preview Your Post:
- Before publishing, preview your post. It’s like reading through a draft of your story to ensure it flows well and looks appealing. Make any necessary adjustments.
10. Save Drafts: – Save drafts as you go along. It’s like preserving different chapters of your story. This ensures that even if you step away, your progress is securely stored.
11. Collaborate with Others: – If you’re working on a collaborative project, you can invite others to contribute. It’s like co-authoring a book – each person brings a unique perspective to enrich the narrative.
12. Edit and Revise: – Editing is like refining the prose of your story. Review your post, check for grammar and spelling, and refine your language. It’s the polishing stage that transforms your initial draft into a polished piece.
13. Schedule or Publish: – Once satisfied, you can either schedule your post for a later time or publish it immediately. It’s like deciding when to unveil your story to the world – maybe as soon as it’s written, or at a strategically planned moment.
14. Respond to Comments: – Engage with your audience by responding to comments. It’s like participating in a book club discussion – interacting with readers and gaining valuable insights.
15. Update as Needed: – Over time, you might want to update your posts. It’s like releasing a revised edition of a book – adding new information, correcting errors, and keeping your content relevant.
Writing and editing posts is your way of narrating the tale of your website. It’s the art of storytelling in the digital realm, where each post contributes to the overall narrative of your online presence. So, go ahead, start crafting your stories, and let your website’s narrative unfold!
5.2 Creating Pages
Creating pages on your WordPress website is like designing the rooms of your digital home. Let’s walk through the process, making it as straightforward as arranging the layout of your favorite space.
1. Access Your WordPress Dashboard:
- Begin by logging into your WordPress dashboard. Picture it as unlocking the door to your digital home, where you have the power to shape the structure and content.
2. Navigate to ‘Pages’:
- Within the dashboard, find the ‘Pages’ section. Think of it as entering the blueprint room, where you plan and construct the foundation of your website’s structure.
3. Click on ‘Add New’:
- Clicking ‘Add New’ is like opening a new floor plan for a room. You have a blank canvas to create a page that serves a specific purpose, whether it’s an about page, a contact page, or any other essential space.
4. Title Your Page:
- Give your page a meaningful title. It’s like labeling each room in your home so that visitors know what to expect. The title sets the tone for the content within.
5. Use the Block Editor:
- Utilize the Block Editor to structure your page. It’s like arranging furniture in a room – each block represents a piece, whether it’s text, images, or multimedia. Experiment with different blocks to achieve the desired layout.
6. Add Content:
- Populate your page with relevant content. Think of it as decorating the room with elements that make it unique and purposeful. Use text to convey information, images to illustrate, and multimedia to engage.
7. Insert Media:
- Enhance your page by inserting media. It’s like decorating your room with artwork or personal touches. Add images, videos, or audio to make the content visually appealing and dynamic.
8. Format Text:
- Format text to suit the style of your page. It’s like choosing the right color scheme or font for a room’s ambiance. Bold important details, create headings for clarity, and ensure a visually pleasing presentation.
9. Preview Your Page:
- Before making it public, preview your page. Imagine stepping back and looking at the room from different angles. Ensure the layout is cohesive, and the content flows seamlessly.
10. Save Drafts: – Save drafts as you work on your page. It’s like taking breaks during decorating – your progress is saved, allowing you to revisit and refine until you’re satisfied with the final result.
11. Publish Your Page: – When ready, publish your page. This is like unveiling a newly designed room to your visitors. It becomes a part of your website’s architecture, accessible to anyone exploring your digital space.
12. Create Additional Pages: – Repeat the process to create additional pages. Each page is like a different room in your digital home, serving a unique purpose. Whether it’s a portfolio, a blog, or a contact page, create spaces that fulfill specific roles.
13. Add Pages to Navigation Menu: – Think of your navigation menu as a guide to different rooms. Add your pages to the menu, creating a logical flow for visitors. It’s like placing signs that lead guests through your digital space.
14. Edit and Update Pages: – Just as you might rearrange furniture, regularly edit and update your pages. Ensure the content remains relevant and aligns with the overall design and purpose of your digital home.
15. Link Pages Internally: – Linking pages internally is like creating pathways between rooms. It enhances navigation, allowing visitors to seamlessly move from one section of your website to another.
Creating pages is the foundational step in building your website. Each page is a unique space, contributing to the overall design and functionality. So, go ahead, start designing your digital home, and let each page be a well-crafted room that adds value and purpose to your online presence!
5.3 Organizing Content with Categories and Tags
Organizing your content with categories and tags in WordPress is like implementing a sophisticated library system for your digital collection. Let’s explore this process, making it as intuitive as arranging books on your favorite bookshelves.
1. Access Your WordPress Dashboard:
- Begin by logging into your WordPress dashboard. Picture it as stepping into your digital library, where you have control over categorizing and tagging your vast collection of content.
2. Navigate to ‘Categories’ and ‘Tags’:
- In the dashboard, find the ‘Categories’ and ‘Tags’ sections. Think of these as the classification and tagging systems in your library – categories define the broad genres, while tags identify specific themes or topics within each genre.
3. Create Categories:
- Imagine categories as the main sections in your library, each representing a distinct genre. Create overarching categories that encapsulate the primary topics or themes of your content. For instance, ‘Technology,’ ‘Travel,’ or ‘Health.’
4. Assign Categories to Posts:
- Once categories are established, assign them to your posts. This is like shelving books under the relevant genres in your library. Categorizing helps visitors navigate your content based on their interests or preferences.
5. Create Tags:
- Tags are like the detailed labels on individual book spines. Create tags that represent specific topics or subthemes within each category. For instance, under ‘Technology,’ tags could include ‘Gadgets,’ ‘Software,’ or ‘Cybersecurity.’
6. Assign Tags to Posts:
- Assign tags to your posts based on their specific content. It’s like adding detailed descriptors to each book, making it easier for visitors to find precisely what they’re looking for within a particular genre.
7. Hierarchical Organization:
- Categories can be hierarchical, allowing for a more structured organization. Picture it as arranging your library’s genres into sub-genres. For example, ‘Technology’ could have subcategories like ‘Mobile Devices’ and ‘Web Development.’
8. Use Consistent Naming Conventions:
- Maintain consistency in naming conventions for both categories and tags. It’s like ensuring a standardized labeling system in your library, making it easy for visitors to understand and navigate.
9. Display Categories and Tags on Your Website:
- Choose how you want categories and tags to be displayed on your website. This is like deciding whether your library shelves should show genres prominently or have detailed index cards for each book.
10. Filter Content by Categories and Tags: – Visitors can filter content based on categories or tags. It’s like offering them the option to explore specific genres or topics in your library, enhancing their overall browsing experience.
11. Utilize Widgets for Navigation: – Widgets, such as category or tag clouds, are like interactive maps in your library. They provide a visual representation of popular genres or topics, helping visitors navigate your content effortlessly.
12. Optimize for SEO: – Categories and tags contribute to SEO by creating a hierarchical structure for search engines. Think of it as optimizing your library catalog for search queries, ensuring your content is discoverable and well-indexed.
13. Review and Adjust Over Time: – Just as a librarian periodically reviews and adjusts the organization of a library, revisit your categories and tags. Ensure they align with the evolving themes of your content and reflect the current interests of your audience.
14. Enhance User Experience: – A well-organized library enhances the user experience. Similarly, thoughtfully implemented categories and tags make it seamless for visitors to explore and discover content that resonates with their interests.
15. Maintain a Balanced Taxonomy: – Strike a balance in your taxonomy. Too many categories or tags can be overwhelming, while too few might limit the diversity of your content. Aim for a taxonomy that reflects the richness of your content without causing confusion.
Organizing content with categories and tags is about creating a user-friendly navigation system for your digital library. Just as a well-organized library invites exploration, a thoughtfully categorized and tagged website encourages visitors to delve into the diverse topics and themes you offer. So, categorize, tag, and let your digital library become a captivating space for your audience to explore!
5.4 Managing Media (Images, Videos)
Managing media in WordPress is akin to curating a captivating digital gallery for your website visitors. Let’s delve into the process, making it as engaging as arranging a collection of artworks in a museum.
1. Access Your WordPress Dashboard:
- Begin your journey by logging into your WordPress dashboard. Picture it as entering the curator’s office, where you have the tools to meticulously manage your digital artworks.
2. Navigate to ‘Media Library’:
- In the dashboard, find the ‘Media Library.’ Think of it as the heart of your digital gallery, where every image, video, or audio file is meticulously cataloged and organized.
3. Upload New Media:
- Upload new media files to enrich your collection. It’s like adding new artworks to your gallery. Whether it’s high-resolution images, captivating videos, or audio clips, each piece contributes to the visual and auditory experience of your visitors.
4. Organize Media Files:
- Organize your media files using folders or tags. Think of it as arranging artworks by themes or genres in your gallery. This organizational structure ensures easy retrieval and a seamless display.
5. Utilize Image Editing Tools:
- WordPress provides image editing tools for enhancements. It’s like having an art restoration workshop for your digital artworks. Crop, resize, or apply filters to optimize each piece for maximum visual impact.
6. Implement Alt Text for Accessibility:
- Adding alt text is like providing descriptive plaques for each artwork. Enhance accessibility by describing your media files, ensuring that all visitors, including those with visual impairments, can fully appreciate your digital gallery.
7. Embed Media in Posts or Pages:
- Embed media directly into your posts or pages. It’s like showcasing specific artworks in curated exhibits. Whether it’s a featured image, an illustrative video, or a background audio track, embedding media enhances the storytelling aspect of your content.
8. Create Galleries:
- Galleries are curated collections of artworks. Similarly, create image or video galleries within your posts or pages. Showcase related media together, providing a visually cohesive experience for your audience.
9. Optimize Media for Performance:
- Optimize your media files for faster loading times. This is like ensuring that each artwork is displayed seamlessly, without delays. Compress images and videos to maintain a smooth browsing experience for your visitors.
10. Implement Multimedia Widgets: – Widgets, such as image or video sliders, are like interactive installations in your gallery. Implement these multimedia widgets to highlight specific artworks, creating dynamic and engaging visual displays on your website.
11. Utilize Featured Images: – Featured images are like the masterpiece that represents a post or page. Choose compelling visuals that encapsulate the essence of your content. It’s the first glimpse visitors get of the digital artwork associated with your narrative.
12. Enable Media Taxonomies: – Taxonomies for media, like tags or categories, are similar to categorizing artworks by style or period. Implement these taxonomies to create thematic groupings, allowing visitors to explore specific genres within your digital gallery.
13. Review and Optimize File Formats: – Consider file formats as the canvas for your digital artworks. Review and optimize file formats based on their intended use. Choose the format that preserves quality while ensuring efficient loading times.
14. Backup Media Files: – Regularly back up your media files. Think of it as securing your valuable art collection. Having backups ensures that your digital gallery remains intact, even in the face of unforeseen events.
15. Ensure Copyright Compliance: – Respect copyright considerations for media usage. It’s like acknowledging the artist’s rights in a traditional gallery. Ensure that you have the necessary permissions or are using media files under appropriate licenses.
Managing media in WordPress is about curating a visually stunning and immersive digital gallery. Each image, video, or audio file contributes to the overall aesthetic and storytelling experience of your website. So, upload, organize, and let your digital gallery captivate visitors with its rich and diverse collection of media artworks!